In the summer of 2010, I built a MakerBot Cupcake CNC from a deluxe kit (batch 15). Over the next year, I upgraded nearly every component, added Bluetooth wireless printing, switched from ABS to PLA, and used it to make everything from costume jewelry to a LED menorah. This is the full story of the build, the fixes, and the things I printed.
Building the Kit
The Cupcake CNC is not a plug-and-play device. The kit arrives as bags of laser-cut plywood, stepper motors, belts, pulleys, a heater barrel, and an extruder you assemble yourself. The instructions for the Cartesian robot are well done; the extruder instructions less so.
Things to know going in:
- Read the full instructions before you start. They’re long, but you’ll avoid mistakes that cost hours to fix.
- Get the extras. Spray-on silicone lubricant, good digital calipers, a one-side razor scraper, and an ISP programmer (USBtinyISP) for burning bootloaders.
- Measure your PTFE bore and thermistor diameter and write them down. You’ll need both when calibrating.
- Put a hose clamp around the base of the PTFE to prevent bulging. Copper tubing works too, but keep it short — copper conducts heat and defeats the purpose of the thermal insulator.
- Use a stick, not a level, for the Z-stage. Put one end at the base of each Z-axis rod and adjust the nuts to match.
When I wound the nichrome wire for the heater barrel, I covered too much of it to screw it back in and still fit the washer and nut. Mark the washer/nut position before winding.
Breaking and Fixing
After a few prints, I broke it. The original plastruder stripped filament constantly, the MK4 drive gear wasn’t aggressive enough, and the PTFE insulator eventually bulged. This is normal.
The fix was replacing nearly every part of the extruder:
- MakerGear PEEK plastruder — superior thermal design, required for PLA printing
- MK5 drive gear — dramatically better filament grip
- Aluminum idler pulley — rock solid compared to the original
- Heated build platform v2 with relay board — eliminated warping entirely, glassy smooth bottoms
- Filament spindle — solves the “filament tangles and stops your print” problem
The heated build platform was the single biggest improvement. Prints went from warped and fragile to flat and professional-looking overnight. Don’t rough up the Kapton tape — it works great smooth. Clean with isopropyl alcohol occasionally.
After the upgrades, I printed insulator retainers and a Z-axis knob. First prints, best prints.
Bluetooth Wireless Printing
Running a USB cable across the room to the printer was annoying, so I added a SparkFun BlueSMiRF Bluetooth serial adapter to the Gen3 RepRap motherboard. The wiring was straightforward — short jumper wires from the BlueSMiRF to the TTL serial header, with the RTS-O pin disconnected to prevent sporadic motherboard resets.
The Ubuntu side took more work. ReplicatorG doesn’t look for /dev/rfcomm0 by default, and the bundled RXTX library doesn’t work with Bluetooth serial. The fix:
- Remove RepG’s bundled
librxtxSerial.so - Point the classpath at Ubuntu’s system RXTX library
- Add
-Dgnu.io.rxtx.SerialPorts=/dev/rfcomm0to the Java command line
After that: wireless printing from anywhere in the apartment.
Switching to PLA
When I ran out of ABS, I switched to PLA on a glass build platform heated to 60C with the MakerGear stepper plastruder at 180C. The results were immediately better:
- Zero warping — PLA’s low shrinkage rate means flat prints without an enclosure
- Glass platform is perfect — PLA adheres well, prints tap off cleanly when cool, and the surface is perfectly flat (my HBP had a slight curve that made raftless printing difficult on Kapton)
- Smells like pancakes — seriously, PLA smells great compared to ABS
The only downside: PLA is stringier than ABS, so reversal settings need adjustment in Skeinforge.
Things I Made
The MakerBot earned its keep by making actual useful (and fun) objects:
Android-Powered, Automated Cat Feeder: An HTC Magic running SL4A provides scheduled and on demand feeding as well as an MJPEG webcam feed.
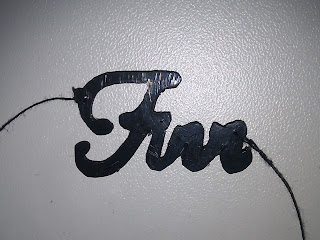
Costume jewelry: For Halloween, Laura wanted a “Finn” necklace from Glee. I photographed the necklace, traced it in Inkscape with Bezier curves, exported to DXF (using the “Better Better DXF Output” extension, with a Python fix for Ubuntu), imported into OpenSCAD, extruded to 3mm, and printed it mirrored so the glossy heated-platform side faced forward.

Upgrades for itself: Insulator retainers, Z-axis knob, extrusion catcher, and eventually a full lowrider and Z-rider conversion — all printed on the machine they were designed to improve.
Multi-day pill container: Designed, printed, and assembled in a single weekend calibration session.
Timeline
Date Milestone 2010-08-07 Kit assembled (batch 15); first prints 2010-08-29 Upgraded: MakerGear PEEK plastruder, MK5 drive gear, aluminum idler, heated build platform, filament spindle 2010-11-01 Printed Glee “Finn” necklace — full Inkscape → DXF → OpenSCAD → MakerBot pipeline 2010-12-05 Built LED menorah with ATtiny2313 2011-03-20 Added Bluetooth wireless printing via BlueSMiRF 2011-06-04 Switched from ABS to PLA on glass build platform